EdPlace's KS2 home learning maths lesson: Using Diagrams to Show Equivalent Fractions
Looking for short lessons to keep your child engaged and learning? Our experienced team of teachers have created English, maths and science lessons for the home, so your child can learn no matter where they are. And, as all activities are self-marked, you really can encourage your child to be an independent learner.
Get them started on the lesson below and then jump into our teacher-created activities to practice what they've learnt. We've recommended five to ensure they feel secure in their knowledge - 5-a-day helps keeps the learning loss at bay (or so we think!).
Are they keen to start practising straight away? Head to the bottom of the page to find the activities.
Now...onto the lesson!
A Picture Paints a Thousand Words...
Fractions are one of the most commonly misunderstood and avoided areas of maths. Ensuring your child has grasped the basics by using diagrams and pictures can mean that they improve their understanding as they move from lower Key Stage 2 into year 5 and 6.
We're confident that if you follow the step-by-step approach below we can make this problem half as tricky for your child! They'll be able to:
1) Understand how to recognise diagrams with equivalent fractions
2) Apply this understanding of fractions to find families of fractions which are all equivalent
3) Explain their understanding back to you, if they've really cracked it!
Step 1 - Terminology Test?
Before we get going, it's crucial to check your child understands the important language we'll use. A fraction is a representation of a part of a whole. In school, it’s very common for teachers to use examples of food being cut into pieces to show what fractions are. You could think of it like slices or parts of a pizza, chocolate bar or a cake. The pizza, cake or chocolate bar represents a whole one, but a slice or piece is a small proportion or a fraction of it.
Step 2 - Mastering the key concepts first...
In year 2, your child will have been taught how to label a fraction in a digram using the numerator and denominator. The numerator is the number at the top of the fraction and shows us how many pieces are shown out of one whole. A denominator is the number at the bottom (think ‘d’ for denominator, d for down!) and this shows us how many pieces the whole one has been split into. E.g the fraction ¼ can be shown like this with 1 piece/section shaded out of four. The whole shape is split into four.

When we talk about fractions and give them names, this can be confusing for children because some fraction names are related to the number (e.g. sixths or tenths) and some are different (e.g. halves, quarters, thirds and fifths).
½ = one half
⅓ = one third
¼ = one quarter
⅕ = one fifth
⅙ = one sixth
It’s really important that your child can say the names of fractions in diagrams as well as labelling them so they’re confident to move their learning on.
We find that putting this into a practical situation can really help, and it doesn't all have to involve cake or pizza! Practise cutting some playdough or paper shapes into equally sized pieces and naming the fractions with your child. Check that they understand that halves are larger than quarters they'll be able to see this, but it's worth pointing out that there is also a clue given by the denominator. The larger the denominator, the smaller the pieces are!
Step 3 - Teaching Equivalents in a Fraction of the Time!
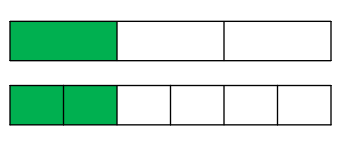
When we are finding equivalent fractions, this means we’re looking for fractions which are worth the same but have differently sized pieces. The best way to introduce these is with diagrams. The diagrams below show some equivalent fractions, you can see that one quarter is the same as 2 eighths. In both shapes, the same proportion of the shape is shaded but the pieces are not the same size.

Another example would be one third and two sixths. The reason the fractions are equivalent is that 6 is a multiple of 3. Two-sixths occupy the same space in the shape as one third.

We can also use a fraction wall to find equivalent fractions. Have a look at the fraction wall, we can see that a half is the same width as two-quarters and four eighths. This concept can be really helpful in showing students equivalent fractions in action!

Step 4 - Putting the Whole Thing Together
Now, we've looked at the ways to show equivalent fractions tangibly to students, why not try the following questions together?
1) Can you name these two equivalent fractions?
2) What are these equivalent fractions called?

3) Using a fraction wall, find a fraction which is worth ¼.

4) I have a cake cut into six pieces and another cake cut into 3 pieces. How could I show two equivalent fractions using the pieces? You could use playdough or drawings to help visualise this.
5) Clare cuts her pizza in half and eats one piece. Steve cuts his pizza into 8 slices and eats the same amount as Clare, what fraction of the whole pizza does Steve eat?
Step 5 - Give it a go...
Now, you’ve covered this together why not put this to the test and assign your child the following activities involving fractions and equivalence.
All activities are created by teachers and automatically marked. Plus, with an EdPlace subscription, we can automatically progress your child at a level that's right for them. Sending you progress reports along the way so you can track and measure progress, together - brilliant!
Activity 1 - Fractions: How Much is Shaded? (1)
Activity 2 - Fractions How Much is Shaded (2)
Activity 3 - Know Your Fractions: Fractions Wall (1)
Activity 4 - Know Your Fractions: Fraction Wall (2)
Activity 5 - Know Your Fractions: Fraction Wall (3)
Answers
-
⅕ and 2/10
-
¾ and 6/8
-
¼
-
⅓ and 2/6 or ⅔ and 4/6
-
Steve eats 4/8 (or half) of his pizza, which is 4 slices
Keep going! Looking for more activities, different subjects or year groups?
Click the button below to view the EdPlace English, maths, science and 11+ activity library


